

What if the most stressful part of your driving exam was actually the easiest to guarantee? Many Ontario drivers feel that mastering parallel parking tips for g2 test success is a high-stakes guessing game where one wrong turn leads to a failing grade. You likely worry about the examiner's clipboard every time you get close to the curb or fear that you'll accidentally tap the car behind you. It's a common source of anxiety, but it doesn't have to be a deal-breaker for your licence.
We agree that the pressure of the G2 road test can make even simple manoeuvres feel impossible. This guide promises to turn that fear into confidence by teaching you a mechanical, step-by-step sequence that works every time. You'll master the reference-point method and learn expert recovery moves for those "just in case" moments. We'll break down exactly when to turn the steering wheel, what the examiner is looking for, and how to stay calm so you can pass on your first attempt in 2026.
Key Takeaways
- Learn our proven 5-step reference point method to eliminate the guesswork. We show you exactly when to turn the wheel and how to position your car half a metre from the other vehicle.
- Understand how examiners score your performance and why the 360-degree check is vital. Forgetting this simple observation is a leading reason students lose marks during the manoeuvre.
- Discover how to use the forward correction trick to save a park that is too deep or too shallow. These parallel parking tips for g2 test success help you fix your angle without hitting the curb.
- Shift your mindset from "feeling" the car to following a mechanical sequence. Mastering this control helps you stay calm and confident when the examiner begins writing on their clipboard.
- Secure your test date quickly once you have mastered these skills to maintain your momentum. Booking your appointment sooner ensures you don't lose the rhythm you have built during practice.
Why Parallel Parking is the Most Feared Part of the G2 Test
Parallel parking is often the first thing new drivers mention when discussing their road test anxiety. It feels like a high-wire act where one small mistake ends the exam. However, the secret is realizing that this manoeuvre is actually a test of vehicle control rather than just a parking exercise. Examiners want to see if you can manage speed and steering simultaneously while maintaining awareness of your surroundings. Understanding the mechanics of parallel parking helps you see it as a repeatable formula rather than a matter of luck.
Many students fail before they even shift into reverse. This happens because they approach the target vehicle with too much speed or too much tension. If you're nervous, you might forget your 360-degree check or fail to signal your intention. This is why mastering these skills is essential for everything you need to know about the Ontario G2 road test in 2026. When you look at the examiner's clipboard, they aren't just looking for a straight car. They are looking for a driver who stays calm under pressure.
The Scoring Breakdown: Major vs. Minor Errors
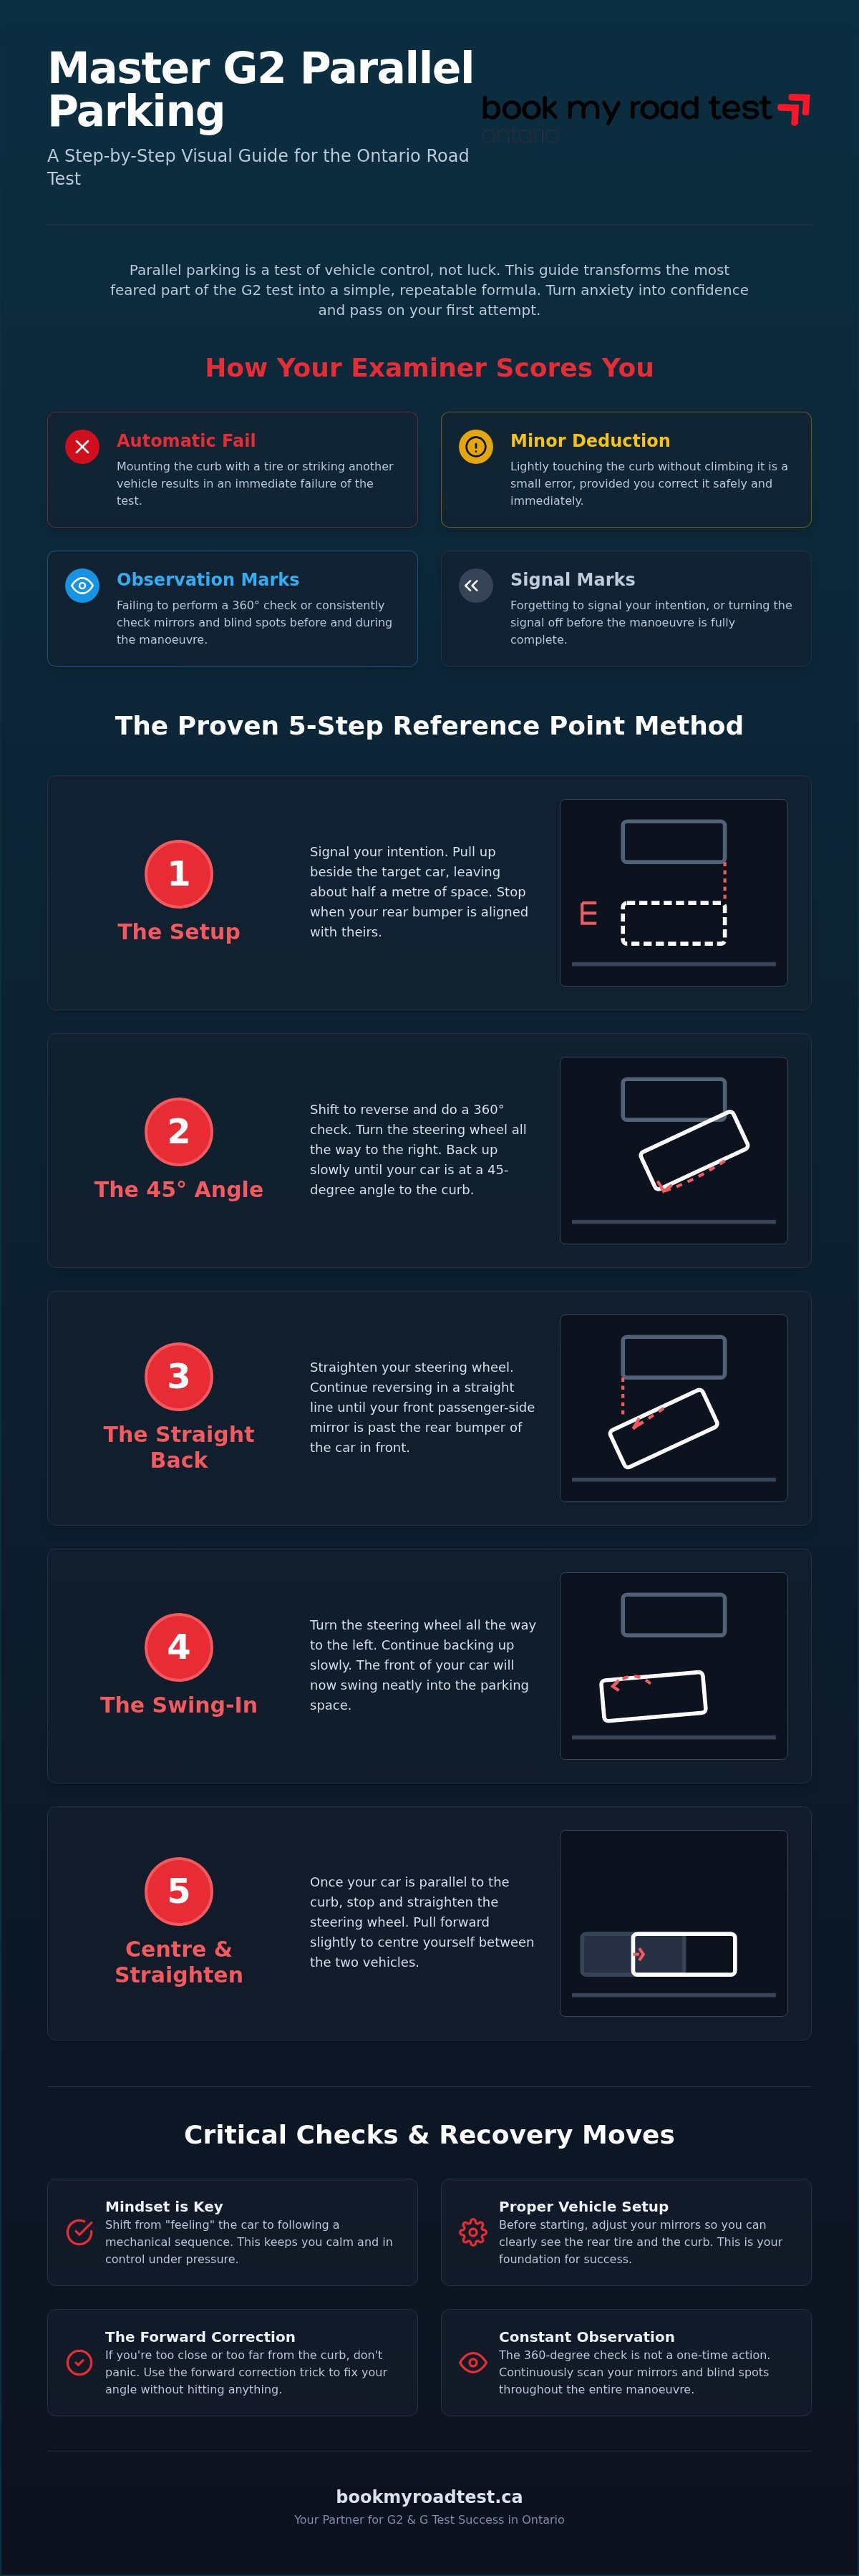
Examiners use a specific scorecard to track your progress. A major error, like climbing the curb or striking another vehicle, results in an immediate failure. Simply touching the curb is usually a minor deduction, provided you correct it safely. You also lose marks for "observation errors." This means failing to look over your shoulder or checking mirrors every few seconds. Your signal must be on before you stop and stay on until you are safely in the spot. These parallel parking tips for g2 test candidates focus on avoiding these common pitfalls that drain your score.
- Automatic Fail: Mounting the curb with a tire or hitting the car behind or in front of you.
- Minor Deduction: Touching the curb lightly without climbing it.
- Observation Marks: Failing to check your blind spots before and during the reverse.
- Signal Marks: Turning your blinker off too early or forgetting it entirely.
Setting the Scene for Success
The 5-Step Reference Point Method for Perfect Parking
Mastering the Ontario road test requires more than just luck; it requires a repeatable system. Applying these parallel parking tips for g2 test preparation turns a stressful manoeuvre into a mechanical routine. By using fixed points on your vehicle, you remove the need to "feel" the distance, which is where most beginners struggle. Citing professional standards on how to parallel park safely ensures you are following a method that examiners across North America recognize as safe and effective.
- Step 1: The Setup — Signal your intention and pull up beside the target vehicle. Stop when your rear bumper is level with theirs, maintaining a distance of roughly half a metre between the cars.
- Step 2: The 45-Degree Angle — Shift into reverse and check your surroundings. Turn the steering wheel all the way to the right and slowly back up until your car is at a 45-degree angle to the curb.
- Step 3: The Straight Back — Straighten your wheels. Reverse in a straight line until your passenger-side mirror is past the rear bumper of the car in front of you.
- Step 4: The Swing — Turn the steering wheel all the way to the left. This allows the front of your car to swing into the spot without hitting the vehicle ahead.
- Step 5: The Straighten — Once your car is parallel to the curb, straighten the wheels and move forward or backward to centre yourself between the vehicles.
Visual Markers You Can Rely On
Reference points are your best friend during the exam. Use the B-pillar, the vertical post between your front and rear windows, as a guide. When that pillar aligns with the rear of the parked car, it is often the perfect time to begin your first turn. To check your angle, look for the "triangle of light" in your side mirror. This is the gap between the curb and the side of your car. If the triangle is visible and narrowing correctly, you are on the right track. You can also identify the 45-degree angle by looking in your driver-side mirror; when you see the entire front of the car behind you, stop and straighten your wheels.
Steering Wheel Mastery
Examiners watch your hands as closely as they watch your car. Hand-over-hand steering is generally preferred because it demonstrates fluid control and allows for faster turns. Use "full lock" (turning the wheel until it stops) for your initial angles, then switch to micro-adjustments for the final straightening. Steering while stationary can cause unnecessary tyre wear but is often allowed during the test. Focus on keeping your movements smooth rather than jerky. Once you've mastered these parallel parking tips for g2 test success, you'll be ready to book your road test appointment and show off your skills with confidence.
Common Mistakes and How the Examiner Scores You
The examiner's scorecard is more than a list of simple checkmarks. It is a detailed record of your safety habits and vehicle control. While many students focus entirely on their final alignment, the process of getting there matters just as much. Forgetting the 360-degree check is the most common reason for lost marks. You must scan the entire area before you shift into reverse. If you only look at your mirrors or backup camera, you have already failed the observation portion of the manoeuvre.
Climbing the curb is another major hurdle that ends many tests early. A small bump might feel harmless, but mounting the curb is usually an automatic failure. It demonstrates a lack of control over the vehicle's placement. However, simply touching the curb is often just a minor deduction. If you feel the tire brush the concrete, don't panic. Stop, adjust, and continue. The MTO handbook requires you to finish within 30cm of the curb. This distance ensures you aren't a hazard to passing traffic or cyclists. Following a guide to parallel parking can help you visualize these distances before you practice in a real car.
You should also be mindful of how many movements you take. While there isn't always a strict "one-try" rule, taking more than three shifts to get into the spot can lead to a point deduction. It suggests you haven't mastered the reference points discussed in the previous section. Using these parallel parking tips for g2 test preparation will help you minimize these extra movements. Efficiency shows the examiner that you are a confident and capable driver.
Observation and Safety Protocols
Safety is the examiner's top priority throughout the test. You must use the "look back" technique. This involves physically turning your head to look through the rear window while reversing. Relying solely on technology is a mistake that will cost you marks. Watch for cyclists and pedestrians, especially before you swing the front end of your car out into the street. Keep your speed very slow. Use only the brake pedal to "creep" the car back. High speed during a park is a sign of poor control and high tension.
Positioning Finality
Once you are in the spot, the manoeuvre is not quite over. You must put the car in Park and engage the emergency brake. This shows the examiner you know how to secure the vehicle properly. Follow the "equal distance" rule by leaving enough space for the cars in front and behind you to exit comfortably. When the examiner tells you to proceed, don't just drive away. Use your signal, check your blind spots, and exit the spot slowly. These parallel parking tips for g2 test success apply from the moment you signal to pull over until you are back in the flow of traffic.
Curb Recovery: What to Do if You Miss Your Mark
Even with the best parallel parking tips for g2 test preparation, things don't always go perfectly. You might misjudge a distance or turn the wheel a second too late. The difference between a pass and a fail often comes down to your ability to recognize the error and correct it safely. Examiners don't expect perfection, but they do expect you to be in control. If you realize your car is heading for a bad landing, you have the power to fix it before the examiner marks it as a fail.
The "Forward Correction" trick is your best tool for saving a park. If you're struggling to get the right angle, shift into drive and pull forward while straightening your wheels. This resets your position and allows you to try the final swing again. While it uses up one of your allowed movements, it's better than mounting the curb. Regarding communication, it's helpful to briefly narrate your actions. Telling the examiner "I'm going to move forward to adjust my angle" shows that you're aware of your surroundings and in command of the vehicle. These parallel parking tips for g2 test candidates provide the safety net you need when the pressure is on.
Fixing a Shallow Angle
A shallow angle occurs when your car stays too far from the curb, usually exceeding the 30cm limit. This happens because you didn't turn the wheel far enough or long enough during the initial reverse. To pull the car closer, use a "Reverse-Straighten-Reverse" sequence. Back up in a straight line for another half-metre before initiating your final left turn. Applying these recovery moves ensures you stay within the legal distance from the curb. Always keep an eye on the front-left corner of your car. You must ensure you aren't swinging the front end into the path of oncoming traffic while you focus on the pavement.
Fixing a Deep Angle
A deep angle is the most common cause of test failure because it leads to climbing the curb. Look for the warning signs in your passenger-side mirror; if your rear tyre looks like it's going to hit the concrete before your car is parallel, you're too deep. Stop immediately. Use a "Full Left Lock" earlier than your reference points suggest to push the rear of the car away from the curb. Composure is everything in this moment. If you panic, you might steer the wrong way or release the brake too quickly. Take a breath and make small, deliberate movements. Once you've mastered these recovery moves, book your road test appointment through our service to secure a spot while your skills are sharp.
Beyond the Maneuver: Securing Your G2 Test Date
Mastering parallel parking tips for g2 test success is a major milestone, but your preparation is only effective if you can actually get to the exam. There is a direct link between your confidence and your readiness. If you spend weeks perfecting your reference points only to wait three months for an appointment, your muscle memory begins to fade. Many drivers fail not because they lack skill, but because they lost their rhythm while stuck in a long queue. In 2026, DriveTest aims to offer appointments within 42 days, but even six weeks is enough time for bad habits to creep back into your driving.
To avoid the wait time trap, you should look for cancellations that allow you to test while your skills are at their peak. Using a road test booking service helps you find these earlier slots without the frustration of manually refreshing a website for hours. This proactive approach ensures that your hard work in the practice car translates directly to a passing grade on your scorecard. Preparation meets opportunity when you can secure a date that fits your schedule and your current skill level.
Final Test-Day Checklist
Your success on test day depends on more than just your steering. You must ensure your vehicle and documentation are in perfect order before the examiner even sits in the passenger seat. If your car fails the initial inspection, your test will be cancelled and you will lose your fee. Ensure you have the following ready:
- Documentation: Your physical G1 licence and the vehicle's valid insurance and registration papers.
- Vehicle Health: All signals, brake lights, and the horn must function perfectly. Your windshield must be clear of major cracks that obstruct your view.
- Timing: Arrive at the DriveTest centre at least 30 minutes early to check in. If you are testing at the new Brampton location at Shoppers World Mall, remember they moved there on June 8, 2026.
- Declarations: Be prepared to declare that Ontario is your primary residence and that your presence in Canada is legal, as required by regulations updated in May 2026.
Booking Your Success
Finding a slot doesn't have to be a bureaucratic headache. Checking for cancellations is the most effective way to jump the queue and find a test date that works for you. Our team specializes in simplifying the g2 road test booking ontario process by managing the search for you. We act as an independent facilitator to help you avoid the long wait times often found at busy centres. Don't let your parking skills go to waste while you wait for a date. Take the final step toward your licence and Book your road test today.
Master Your Manoeuvres and Get on the Road
Parallel parking doesn't have to be the reason you fail your road test. By mastering the 5-step reference point method and knowing how to recover from a bad angle, you turn a source of anxiety into a clear display of skill. Remember that examiners prioritize safety and observation over a perfect landing. If you stay calm and use the recovery techniques we discussed, you'll show the control needed to earn your licence on the first attempt.
Once you feel confident in these parallel parking tips for g2 test preparation, the final step is finding a date while your skills are still sharp. We provide expert support for Ontario drivers through a stress-free booking process that bypasses the long wait times at DriveTest centres. Our system uses real-time cancellation monitoring to help you secure a slot quickly, ensuring you don't lose your momentum while waiting for an appointment.
Ready to pass? Secure your G2 road test appointment with Book My Road Test Ontario today!
You have the tools and the method to succeed. Now, it's time to get behind the wheel and prove it. We are here to help you cross the finish line with confidence and ease.
Frequently Asked Questions
Is parallel parking an automatic fail on the G2 test in Ontario?
No, parallel parking is not an automatic fail unless you commit a major safety violation or a dangerous action. While a poor park results in point deductions, you can still pass the test if your overall score remains high. However, mounting the curb or striking another vehicle will lead to an immediate failure because it demonstrates a lack of basic vehicle control.
How many times can I try to parallel park during the test?
You are generally allowed one attempt that includes up to three shifts of the vehicle to get into the spot. While examiners may allow some minor adjustments, taking too many movements suggests you haven't mastered the necessary control. It is best to use your reference points to find the right angle early so you don't need to keep shifting back and forth.
What happens if I hit the curb during parallel parking on my road test?
Touching the curb is usually a minor deduction, but mounting or climbing the curb is an automatic failure. If you feel a light brush against the concrete, stop and adjust your position safely. These parallel parking tips for g2 test success emphasize staying calm and using a forward correction to fix your angle before your tire actually climbs over the edge of the pavement.
Do I have to parallel park between two cars or just behind one?
On the Ontario G2 test, you are typically required to park behind a single vehicle rather than between two. This provides more space to manoeuvre, but you must still treat the area as a confined spot. You are expected to reverse into the space behind the target car and finish within a specific distance of the curb without reversing too far back.
Can I use a backup camera for parallel parking during the G2 test?
You can use a backup camera, but you must not rely on it as your primary source of information. Examiners watch to ensure you are physically turning your head to look through the rear window while reversing. If you stare only at the dashboard screen, you will lose marks for poor observation habits. Technology is meant to assist you, not replace your blind-spot checks.
What is the 30cm rule for parallel parking in Ontario?
The 30cm rule requires your vehicle to finish within 30 centimetres of the curb to be considered safely parked. If your car is further away than this, you may be creating a hazard for passing traffic or cyclists. Using these parallel parking tips for g2 test candidates helps you judge this distance. You can use your passenger-side mirror to verify that your car is parallel and close to the concrete.
Do I need to use my parking brake after I finish parallel parking?
Yes, you must engage the parking brake every time you finish a parking manoeuvre during the road test. This shows the examiner that you know how to secure the vehicle properly before leaving it. Failing to set the emergency brake is a common minor error that can lead to point losses. Always put the car in Park and set the brake before telling the examiner you are finished. Just as you learn to secure your vehicle, you can also visit Candoor to discover how to enhance the safety of your home with specialized residential fire shutters.What if there is no car to parallel park behind at the test centre?
If no vehicles are available on the street, the examiner might ask you to simulate the park against the curb or use pylons. While this is less common, you should still follow the exact same steps, including signalling and checking your blind spots. Act as if a vehicle is present to demonstrate that you have memorized the mechanical sequence and safety protocols required for a real-world scenario.


