

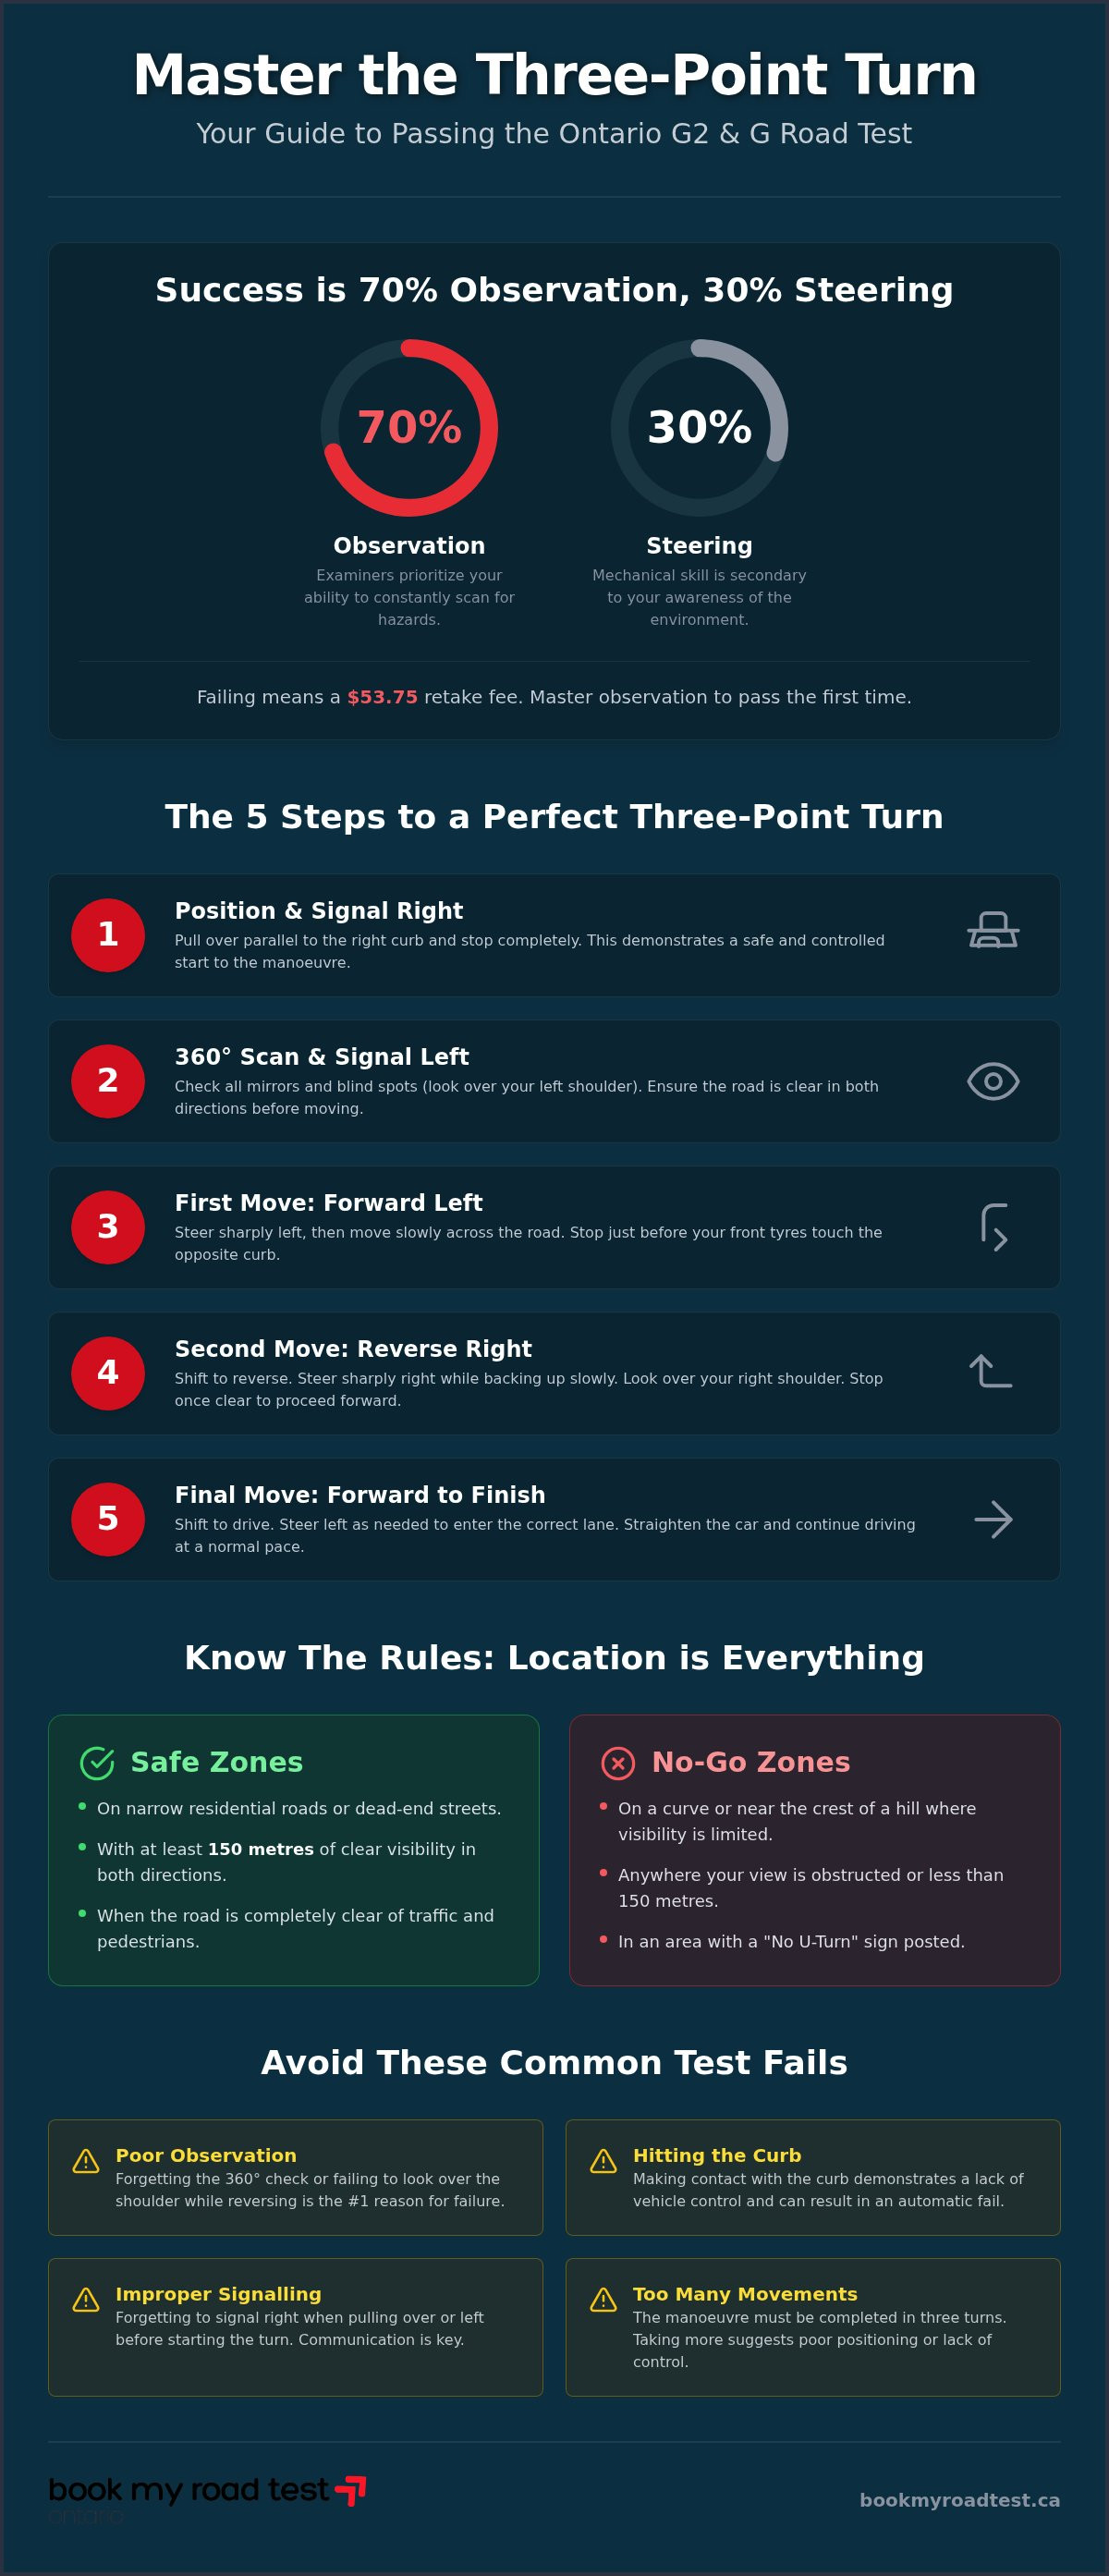
The hardest part of a three-point turn isn't the steering; it's the observation. While most drivers panic about hitting a curb, Ontario examiners are actually focused on your ability to scan for traffic and pedestrians. In fact, learning how to master three point turns is 30 per cent steering and 70 per cent observation. It's natural to feel a bit of anxiety when you're trying to remember which way to turn the wheel while reversing on a narrow residential street. You want to pass your test the first time and avoid that $53.75 retake fee, but the pressure of a silent examiner can make anyone second-guess their mirrors.
This guide simplifies the process by showing you the exact mechanics and safety checks required to perform a flawless turn on your Ontario road test. You'll learn how to complete the manoeuvre in just three movements while maintaining total control of your vehicle. We will walk through the step-by-step requirements of the Ministry of Transportation, from the initial signal to the final check. This guide provides the peace of mind you need to turn a stressful requirement into a smooth, routine habit before you head to the DriveTest centre.
Key Takeaways
- Understand why this essential manoeuvre is a mandatory requirement for both G2 and G road tests in Ontario.
- Learn how to master three point turns by following a precise sequence of signals and steering movements.
- Use the "Clock Pattern" observation strategy to ensure you complete the 360-degree safety checks examiners prioritize.
- Identify common mistakes, such as improper curb positioning, that can lead to an automatic failure on your test.
- Build the confidence to execute smooth turns on narrow streets so you can feel ready to book your road test.
What is a Three-Point Turn and Why is it Essential?
A three-point turn is a fundamental driving manoeuvre used to reverse your direction on a road that is too narrow for a standard U-turn. While professional driving instructors often refer to it as a "turn in the road," most students know it as a high-stakes requirement for the Ontario road test. It is a precise sequence of movements that demonstrates your ability to coordinate steering, braking, and constant observation. If you want to know how to master three point turns, you must first understand why the Ministry of Transportation (MTO) includes it in every practical exam. It proves you can handle your vehicle in tight spaces without losing track of the environment around you.
This skill is mandatory for both G2 and G level road tests across the province. Examiners aren't just looking for a smooth turn; they are assessing your safety habits. They want to see that you can manage the car's path while keeping a sharp eye out for other road users. To understand what a three-point turn is, you have to view it as a test of your spatial awareness. Mastering this move reduces the stress of your test day and ensures you can handle real-world driving challenges. Understanding these fundamentals is the first step in learning how to master three point turns for your G2 or G licence.
When to Use a Three-Point Turn in the Real World
In your daily commute, you will likely encounter narrow residential roads or dead-end streets where a U-turn is physically impossible. A three-point turn is the safest alternative when visibility is clear but space is limited. It allows you to change direction without the need for complex, multi-point turnarounds that can leave you stranded in the middle of the road for too long. Using this method keeps your movements predictable for other drivers, which is essential for maintaining safety in quiet neighbourhoods.
The Legalities of Turning Around in Ontario
Ontario law sets specific boundaries on where you can legally perform this manoeuvre. You must never attempt a three-point turn on a curve, near the crest of a hill, or anywhere visibility is obstructed. The MTO requires that you have at least 150 metres of clear visibility in both directions before you begin. Always check for "No U-Turn" signs, as these often prohibit any form of turning around in that specific area. Before you start the process, you must ensure the road is wide enough to complete the turn in three distinct movements. If the road is too narrow, you might need to find a driveway or a different intersection to change your direction safely.
Step-by-Step: How to Execute a Perfect Three-Point Turn
Executing a flawless three-point turn is about rhythm and control. It requires you to manage the vehicle in a confined space while maintaining constant awareness of your surroundings. Learning how to master three point turns means breaking the process into five distinct, manageable phases. While local regulations vary, this step-by-step guide provides a universal framework for safe turning mechanics that Ontario examiners expect to see.
- Step 1: Position your vehicle. Signal right and pull over parallel to the curb. Stop the car completely. This shows the examiner you are starting from a safe, controlled position.
- Step 2: The 360-degree check. Signal left. Check your mirrors and look over your left shoulder. You must ensure the road is clear in both directions before moving.
- Step 3: The first move. Turn the steering wheel sharply to the left. Move the vehicle slowly across the road toward the opposite curb. Stop just before your front tyres touch the edge.
- Step 4: The reverse move. Shift into reverse. Turn the steering wheel to the right while backing up. Look over your right shoulder to watch the space behind you. Stop once you are roughly halfway across the road.
- Step 5: The final move. Shift back into drive. Turn the steering wheel left and move forward into the correct lane. Straighten the car and continue driving at a normal pace.
Consistency is key during your road test. If you can perform these steps without hesitation, you demonstrate the confidence needed for a G2 or G licence. Once you have the mechanics down, you can find an earlier road test date to put your skills to the test.
Steering Techniques for Tight Spaces
The most effective strategy for tight turns is the "turn fast, move slow" rule. You should rotate the steering wheel quickly while the car is moving at a crawl. This allows for maximum wheel angle with minimal forward travel. Use the hand-over-hand method to keep your movements fluid. Avoid "dry steering," which is turning the wheel while the car is completely stationary. This puts unnecessary strain on your tyres and steering components, and some examiners may mark it as a minor error.
Pedal Control in Automatic Vehicles
In an automatic vehicle, you rarely need to touch the accelerator during a three-point turn. Instead, use "creep speed" by slowly easing off the brake pedal. This gives you a steady, slow pace that makes it much easier to perform 360-degree checks. If the car moves too quickly, you lose the ability to scan for hazards effectively. Keep your foot poised over the brake at all times. This ensures you can stop instantly if a pedestrian or another vehicle enters your turning path. Mastering this delicate balance is a major part of how to master three point turns successfully.
Observation Strategy: The Secret to Passing the Road Test
Steering precision is impressive, but observation is what actually earns you a passing grade. Ontario DriveTest examiners are trained to watch your eyes and head movements more closely than your hands on the wheel. They need to see that you are aware of everything happening around your vehicle. If you want to know how to master three point turns, you must treat every pause in the manoeuvre as a fresh opportunity to scan for hazards. A common reason for failure isn't hitting a curb, but failing to notice a cyclist or pedestrian approaching from a blind spot. Your mirrors are helpful, but they don't tell the whole story.
Identifying blind spots before every change in direction is a non-negotiable part of the test. This means checking over your shoulder every time you shift from drive to reverse, and again before moving forward. You must be proactive rather than reactive. By the time you see a car in your side mirror, it might already be too close for you to stop safely. Moving your head clearly and deliberately shows the examiner that you are a safe, attentive driver who prioritizes the well-being of others on the road.
The 360-Degree Check Explained
To perform a perfect 360-degree check, use the "Clock Pattern" to ensure no area is missed. Start by looking over your left shoulder, then rotate your gaze clockwise through the side window, the windshield, the right side window, and finally over your right shoulder. A 360-degree check is a continuous scan of all surroundings before the vehicle moves to ensure no pedestrians, cyclists, or vehicles have entered your path. Your mirrors should only be used as secondary tools to confirm what your physical head checks have already revealed. Examiners are looking for that distinct shoulder turn to verify you are checking your blind spots properly.
Managing Approaching Vehicles
If a vehicle approaches while you are sideways across the road, don't panic. The safest move is usually to stop and wait to see what the other driver does. If they stop and wave you through, you can complete the turn quickly and safely. However, if they keep coming, you must yield the right-of-way. Causing another driver to brake or swerve because of your turn is often an automatic failure. Signal your intentions clearly and only finish the move when you are certain the path is clear. Understanding how to master three point turns includes knowing when to stay still and wait for a safer gap in traffic.
Common Mistakes That Can Cost You Your Licence
Even the most confident drivers can stumble when an examiner is watching their every move. Understanding the pitfalls is just as vital as knowing the mechanics of the manoeuvre itself. If you are learning how to master three point turns, you must recognize which errors are minor and which will end your test immediately. Most failures occur not because the driver lacks skill, but because they lose focus on the small details that signal safety to the examiner. Being aware of these common traps allows you to prepare more effectively.
- Climbing the curb: While a light touch might only cost you points, driving the wheel up onto the curb is an automatic failure. It demonstrates a lack of vehicle control.
- Forgetting to signal: You must signal right when pulling over and left before starting the turn. Failing to do so makes your movements unpredictable to others.
- Missing blind spot checks: This is the most common error. If your head doesn't move to check over your shoulder before every movement, you aren't demonstrating safe observation habits.
- Exceeding three points: The move is designed to be completed in three steps. If you require four or five movements, it suggests you didn't turn the wheel sharply enough or misjudged the road width.
Minor Errors vs. Automatic Failures
There is a significant difference between a point deduction and an immediate "did not pass" result. Touching the curb gently with your tyre is usually considered a minor error, provided you don't mount the sidewalk. However, if your manoeuvre causes another driver to slam on their brakes, that is a dangerous action and an automatic fail. Similarly, incomplete 360-degree checks will accumulate points quickly. If you block traffic for an unreasonable amount of time because you're hesitant, the examiner may decide you aren't ready for the responsibilities of a solo licence. Consistency and confidence are your best defences against these deductions.
Overcoming Test-Day Nerves
Anxiety is often the root cause of these common mistakes. Visualizing the turn before you arrive at the DriveTest centre can help settle your mind. Try practising in different weather conditions; rain or snow shouldn't change your technique, but it can certainly change your confidence levels. It is also helpful to remember that road test appointment stress is a normal experience for almost every driver in Ontario. If you've practised the mechanics, you have the skills to succeed. Once you feel ready to show the examiner you know how to master three point turns, you can find an earlier road test appointment to secure a convenient time slot.
Master the Move and Book Your Ontario Road Test
Consistent practice is the only way to make the three-point turn feel natural. While the theory is straightforward, the physical coordination of steering and pedal control requires repetition. It takes time for your hands to move instinctively while your eyes remain focused on scanning for hazards. If you want to know how to master three point turns, you should spend time in a quiet area until you can complete the move without second-guessing your wheel direction. Muscle memory is your best friend when test-day nerves start to kick in.
Using reference points on your car is a practical way to know when to stop near the curb. For many drivers, aligning the bottom of the side mirror with the curb line helps judge the distance accurately. You should also prepare your vehicle for the test well in advance. Ensure your mirrors are adjusted for maximum visibility, your tyres are properly inflated, and all signal lights are functioning. A well-maintained vehicle shows the examiner you take safety seriously before you even put the car in gear. This preparation is a vital part of how to master three point turns and the road test as a whole.
Final Practice Checklist
Before you head to the DriveTest centre, run through this final checklist to ensure you are ready for the challenge. These small steps can be the difference between a pass and a fail.
- Find a quiet residential street with low traffic levels to run your drills repeatedly.
- Have a licensed passenger watch your head movements to ensure you are actually checking blind spots.
- Review our guide on everything you need to know about the Ontario G2 road test for a full overview of expectations.
- Practise the turn in different positions on the road to get used to varying widths.
Secure Your Test Slot Without the Wait
Mastering the skills is step one; finding a test date is step two. In many parts of Ontario, booking windows can be several months long, which can be frustrating when you are ready to drive. Our service helps you skip the stress of refreshing the official website for cancellations. We act as a helpful intermediary to find earlier slots that fit your schedule. Use our road test booking service to secure a time that works for you. Once the logistics are handled, you can focus entirely on your driving skills and pass your test with confidence.
Ready to Take Your Ontario Road Test?
Learning how to master three point turns is a major milestone in your journey toward a full G licence. By focusing on the 360-degree observation strategy and maintaining slow, controlled pedal movements, you can turn a stressful manoeuvre into a routine habit. Remember that examiners prioritize your safety checks and blind spot awareness over perfect steering precision. Avoiding common errors like mounting the curb or forgetting your signals will keep you on the right path to success during your G2 or G road test.
Once you feel confident behind the wheel, the next step is finding a test date that works for your schedule. Our independent service is designed to reduce booking stress by helping you navigate DriveTest availability more efficiently. We provide specialized support for drivers across Ontario, helping you secure a road test slot faster than waiting for standard availability. Book your G2 or G road test appointment today and get one step closer to your driving goals. With the right preparation and consistent practice, you are ready to impress your examiner and earn your freedom on the road.
Frequently Asked Questions
Is a three-point turn required on the G2 road test in Ontario?
Yes, the three-point turn is a mandatory component of both the G2 and G road tests in Ontario. Examiners use this manoeuvre to evaluate your vehicle control and spatial awareness in tight spaces. Since it is a core requirement, you should practice until the movements become second nature. Mastering this skill is essential for passing your exam on the first attempt and moving toward your full licence.
What happens if I hit the curb during a three-point turn on my test?
Hitting the curb results in different consequences depending on the severity of the contact. A gentle touch with your tyre usually results in a minor point deduction, provided you don't climb onto the sidewalk. However, hitting the curb hard or mounting it with any part of the vehicle is typically considered an automatic failure. This is often marked as a dangerous action or a lack of vehicle control.
Can I do a five-point turn if the road is too narrow?
You are expected to complete the turn in exactly three movements during your official road test. If the road is exceptionally narrow, you must still attempt to finish in three points by turning the wheel as sharply as possible. Taking five points indicates that you misjudged the space or didn't use the full range of your steering. If you are learning how to master three point turns, focus on maximizing your wheel angle.
Do I need to use my turn signals during a three-point turn?
Yes, you must use your turn signals to communicate your intentions to other road users. You should signal right when pulling over to the side of the road to begin the manoeuvre. Then, you must signal left before moving across the road for the first part of the turn. Failing to signal is a common error that results in point deductions during the Ontario road test.
Should I look at my backup camera during the manoeuvre?
You should only use your backup camera as a secondary aid, as examiners require you to perform physical head checks. You must look over your right shoulder while reversing to show you are scanning your surroundings. Relying solely on a screen is a common mistake that can lead to a failure. Examiners want to see that you are using your mirrors and blind spot checks to stay safe.
How long do I have to complete the three-point turn during the exam?
There is no specific time limit for the turn, but you must complete it within a reasonable timeframe. The examiner looks for a steady, continuous movement that doesn't unnecessarily block traffic. If you hesitate for too long or struggle with the controls, you may lose points for a lack of confidence. The goal is to perform the turn smoothly and efficiently without rushing your safety checks.
What is the difference between a three-point turn and a K-turn?
There is no functional difference between a three-point turn and a K-turn; they are two names for the same manoeuvre. The term K-turn comes from the shape the vehicle makes on the road during the three movements. While the Ontario Driver’s Handbook officially uses the term three-point turn, some instructors might use the alternative name. Both terms describe the process of reversing direction on a narrow residential street.
Where am I not allowed to practice three-point turns?
You are prohibited from performing three-point turns on hills, curves, or anywhere where you don't have 150 metres of clear visibility in both directions. It is also illegal to practice in areas with No U-Turn signs. To learn how to master three point turns safely, find a flat, quiet residential street with low traffic. This ensures you can focus on your steering and observation without creating a hazard for other drivers.


